As I was reviewing my potential submissions for the "Sense of Place" assignment, I recognized that several of the potentially decent images would need substantial "recovery" efforts because my primary subject was in deep shadow. However, Rebecca's images of similar scenes were just fine. I have noticed this consistently over the last several months, and after thinking about it, the reason why is pretty obvious. Rebecca is most often carrying our 1-year old, along with all the accoutrements that must accompany a young child, and so literally has her hands full. Because of this, Rebecca often carries our Canon S3 point-and-shoot camera instead of a digital SLR. The "built in" advantage of the point-and-shoot is a flip up flash. If the subject is in shadow, Rebecca simply flips up the flash and applies "fill flash" to the subject. I on the other hand, would have to take my flash out of the camera bag, attach it to the camera, turn on the flash, reorient it toward my subject, set the correct flash mode, and then take the picture. In other words, I often just don't have the time to attach the flash and still "capture the moment" (or maybe I'm too lazy sometimes). But still, I know that if I were to use fill flash, I could get consistently better images. (Or maybe the answer is that I should carry McKenzie more often?

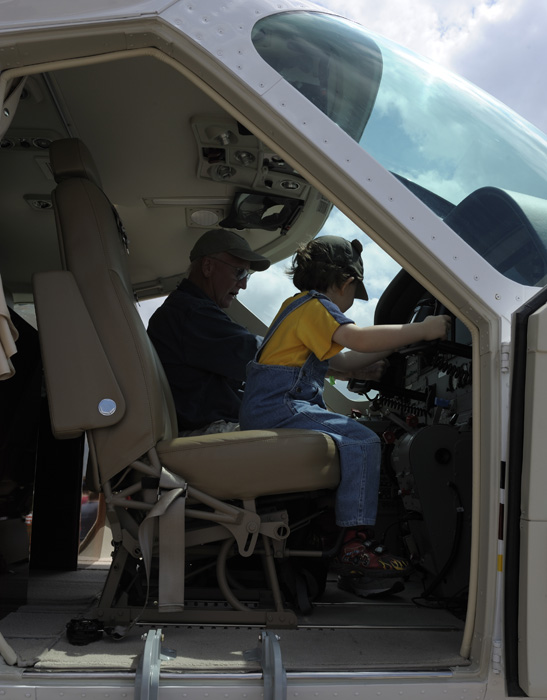
Oops! I should have used fill flash!
Here is the "recovered" version, note however that colors and contrast would have been much better if I would have used fill flash to begin with:
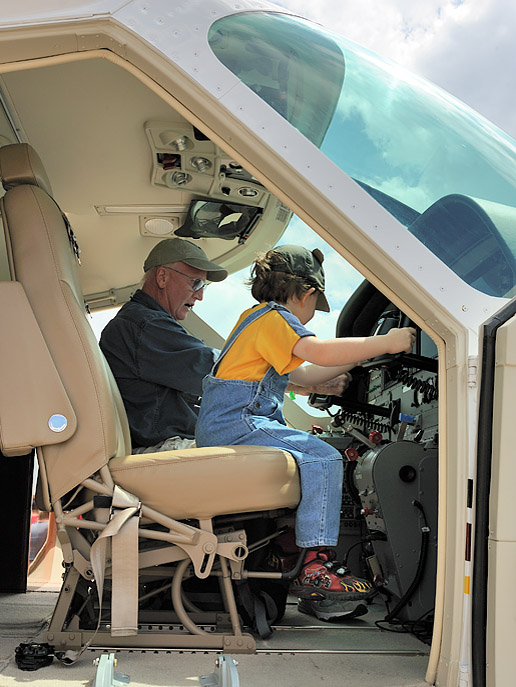
Shadows recovered with D-lighting in Capture NX2
I'd like to start out by making the distinction between using flash as a primary light source and using "fill flash." As the name implies, fill flash is used to supplement the ambient light on the subject, or to balance the light on the subject with a brighter background by "filling in" the shadows. A key characteristic of well executed "fill flash" is that it doesn't look "over-flashed."
It is also important to understand that we will never get decent fill flash images unless we
start by controlling the ambient exposure. A classic situation where fill flash might be required is when you are photographing a subject in shadow in front of a bright mid-day sky. In this situation, if we take the exposure in full auto mode (even if we are using fill flash) the sky will almost always be "blown out" (badly overexposed) and unrecoverable in post processing. So, we have to begin by correcting our ambient exposure to keep from overexposing the sky. The easiest way to do this of course is to meter on the sky, and set your exposure accordingly. This is easy enough if your are using spot metering and manual exposure. Meter on the blue sky, decide how much lighter it should be than "mid-tone" and set your exposure accordingly. (Hint: probably somewhere between +0.3 EV for a "deep blue" sky and +1.7 for a "bright" (almost white) sky.) If you are using matrix or evaluative metering and one of the autoexposure modes, simply use negative exposure compensation and check your histogram and "blinkies" to ensure the blue sky is not "clipping" because it is overexposed.
Once you have the exposure set for the sky, you now need to decide how much illumination your subject needs from the flash. If you set the flash on full auto, or in one of the TTL modes, the flash will typically provide the appropriate amount of light for the subject, as if the flash were the primary light source. This results in a flash to ambient ratio of 1:1, which will often look unnatural or "over-flashed." So, you will need to "dial down" your flash in order to get pleasing results. A
general rule of thumb is that TTL flash with a negative
flash exposure compensation of -2 will
just barely begin to fill in the shadows on your primary subject. So, you will want to set negative exposure compensation on your flash somewhere between -1.7 and -0.3 EV. The setting I see photographers recommend most often is -0.7EV, and this is consistent with my experience. This will provide adequate "fill" in the shadows, but still allow enough of a hint of shadows on the subject to allow the image to look natural. So, start with -0.7 EV flash exposure compensation (or -0.5 EV if your camera only allows 1/2 EV increments) and adjust from there. Too much flash will result in "flat" looking images, since you will be removing contrast and eliminating the shadows that provide "depth" cues. The key is to use just enough flash to provide sufficient detail and natural color in the shadows, while not overdoing it.
You will need to watch that your shutter speeds don't exceed the maximum sync speed of your camera, which on most modern cameras is around 1/250th of a second. If your shutter speed display is flashing, or indicated in red, or displays as "HI" in the viewfinder, then you will need to select a lower ISO or smaller aperture in order to let the camera select a shutter speed of 1/250th or slower, otherwise your shutter speed will "max out" and the ambient exposure will be overexposed. Many digital SLRs have a "flash pulse" mode that will let you shoot at higher shutter speeds, but be aware this will substantially reduce the range of your flash, and may make it difficult to get enough light on your subject to adequately "fill" the shadows. In most cases I have found it more appropriate to use a smaller aperture to reduce my ambient exposure instead of using a faster shutter speed and the "flash pulse" mode.
Be aware that adjusting your aperture and ISO will affect
both your ambient and flash exposures, whereas adjusting your shutter speed will only affect your ambient exposures (when you are shooting at or below the maximum sync speed of your shutter). This is because your flash duration is shorter than 1/250th of a second, so for example, lengthening the time the shutter is open from 1/250th to 1/125th of a second will double the amount of ambient light hitting the sensor, but have no effect on the amount of light from the flash hitting the sensor. (The pulse of light from the flash is completed within the first 1/250th second of the exposure, so it doesn't matter how much longer you leave the shutter open, you still won't get any more light from the flash.) You can use this knowledge to "balance" your ambient and flash exposures. If the flash is "just right" but the ambient exposures are too dark, simply lengthen the shutter speed until you get a good ambient exposure (that is well balanced with the flash).
At the other extreme from "blown out" skies is the situation where the ambient light is too dim to provide adequate light on the background for our "default" flash and exposure settings. Most often, cameras will have a "default" slowest synch speed that will automatically set the shutter speed when you attach (or turn on) the flash. This shutter speed is often 1/60th of a second. So, we arrive at the wedding reception, pull out our flash and attach it to the camera, turn the camera on and see that at our (previously set) ISO setting of 200 the camera is recommending a shutter speed of 1/60th of a second and a "mid-range" aperture setting. If we take a test shot at these settings, the primary subject will be illuminated just fine (the camera will automatically adjust the flash power) but the background will be underexposed. If you proceed to run about the reception hall snapping pictures of the wedding party with these settings, your subjects will appear "over flashed" and the backgrounds will be dark, giving your snapshots that telltale "tunnel" effect you get when using flash as your primary light in such a situation. Again, the best images will result from
balancing your flash exposures with the ambient light, which always starts with selecting the appropriate exposure settings for the ambient light.
To determine appropriate exposure settings for balanced ambient light and flash, first turn off your flash and examine the camera's recommended exposure settings without the flash. Chances are that in an "average" reception hall, the light levels will result in recommended exposure settings of between 1/8th and 1/30th of a second at an aperture of f5.6 or f8 and ISO 200. First of all, these shutter speeds are much too slow to be very successful for taking images without motion blur. That's one of the reasons your camera will "default" to a minimum shutter speed of 1/60th of a second (and consequently will need to use the light from the flash as a "primary" light source to adequately illuminate the subject). I recommend that you select a shutter speed fast enough to stop most motion blur from "normal" movement of your subjects (1/125th of a second or faster), and select a "mid-range" aperture to give adequate depth of field without reducing the amount of light hitting the sensor by too much (something in the f5.6 to f8 range for a digital SLR, or in the f2.8 - f4 range for a point-and-shoot). In order to get your camera to select shutter speeds and apertures in the ranges recommended above, you will need to adjust your ISO higher. You can safely shoot at ISO 800 to 1600 with a modern dSLR, and up to ISO 400 with a modern point-and-shoot without too much noise intruding into the image. If the light levels aren't bright enough to allow you to use the recommended ISO, shutter speed and aperture settings, then adjust your shutter speed down to 1/60th of a second.
Once you have your ambient exposure set, turn on your flash. Now your flash exposures should be well balanced with the ambient light, and you are truly using "fill flash" to supplement the ambient light. This is a change in paradigm from the old days of film (and first and second generation digital cameras) where the film sensitivity wasn't high enough to allow decent exposures and photographers were forced to rely on flash as their primary light source while indoors. You may still want to "dial down" the flash exposure by setting -0.3 EV exposure compensation
on the flash in order to prevent that "over flashed" look, but be careful about going too low. In this case, the stronger light from the flash helps compensate for the need to use higher ISOs, and setting too low of a setting on the flash will result in "noisy" shadows.
Your assignment for the week of 31 August - 6 September 2009 is "Fill Flash." It takes a lot of experience to get "perfect" flash exposures all the time, so if you have any questions please don't hesitate to ask.
Please upload your images to the "Fill Flash" album in the Weekly Assignments category of the Gallery no-later-than Midnight Mountain Time (GMT -07:00) on Sunday, 6 September 2009. I'll look forward to seeing your images.
Keith


