

|
Digital Photography Tutorials |
Digital Photography “From Camera to Print”By Keith and Rebecca SnellTransferring the Image from the Camera Basic Post-processing in Photoshop Building and saving a Sharpening Action
|
|
Camera Raw
Opening the Image in your Raw Converter There are many good Raw Converters available, including those that are available from your camera manufacturer and optimized for your particular camera; however, we will use Adobe Camera Raw (Camera Raw) for most of our lesson, since this is fast becoming a “universal” raw converter. That said, we still prefer Nikon Capture as our raw converter for our Nikon images, and we will cover the specifics of using Capture in a later section.
For now we will use Camera Raw for our discussions, since the functionality and concepts are very similar across the different converters. The Camera Raw module should automatically come up when you try to open a raw image in Photoshop. If it doesn’t, then your camera software has probably loaded its own plug-in that is preempting the Camera Raw module from opening. You can correct this by removing the plug-in installed by your camera software. To do this, close Photoshop, navigate to the folder at C:\Program Files\Adobe\Photoshop CS\Plug-Ins\Adobe Photoshop Only\File Formats, and remove the Nikon NEF Plugin.8Bi file (or your specific camera manufacturer’s plug-in) from this folder. When you restart Photoshop and open a raw file the Camera Raw window with now be available.
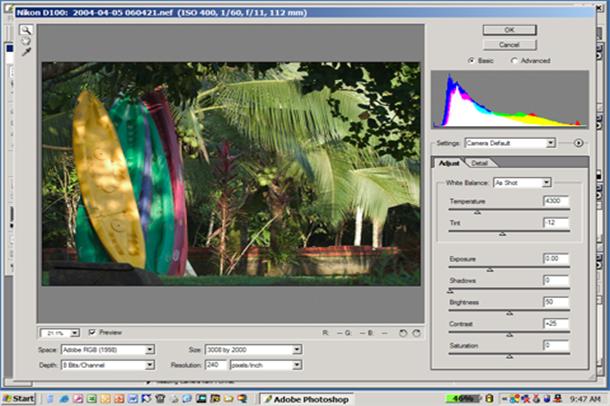
When you open your raw file, you should see a screen that looks like Figure 1. This Camera Raw window is where you set all you “global” image corrections prior to opening the image into Photoshop. You should use Photoshop primarily for those “localized” image corrections that can’t be done in Camera Raw. Our goal is to select the settings that will give us an image file with the maximum possible quality, and to use this file as our reference copy and starting point for all of the output files we generate from this image.
Figure 1: Camera Raw Window
Although the steps that follow can be done in any order, there is a logical flow that will make it easier to get consistent results with the minimum effort. I’ll list the steps, and then go over each in more detail.
1. Adjust image import parameters a. Color Space b. Bit Depth c. Size d. Resolution
2. Adjust White Balance/Color Temperature a. White Balance selection b. Temperature Slider c. Tint Slider d. Click Balance with White Balance tool
3. Adjust Exposure a. Exposure Slider b. Shadows Slider c. Brightness
4. Adjust Contrast a. Contrast slider b. Tweak brightness slider as required
5. Adjust Saturation
In the following Camera Raw sections we will go through each step in the raw processing workflow in detail. |
|
Spirit of Photography Keith and Rebecca Snell |