

|
Digital Photography Tutorials |
Digital Photography “From Camera to Print”By Keith and Rebecca SnellTransferring the Image from the Camera Basic Post-processing in Photoshop Building and saving a Sharpening Action
|
|
Advanced Photoshop Sharpening
Capture Sharpening Because the large majority of digital cameras have an “anti-aliasing” filter in front of the sensor that slightly blurs the image, (this is to prevent moiré) the image can look blurry on your computer screen. It is difficult to judge the technical quality of your images without first applying a little bit of sharpening to counter the blurring effects of the anti-aliasing filter. This step is called “capture sharpening.”
Capture Sharpening can be applied through moderate sharpening in your raw converter, especially if it has an advanced sharpening algorithm that attempts to sharpen only the “edges” in the image. (Nikon capture appears to use sharpening algorithms that sharpen edges more than smooth areas of the image.) If you are not going to substantially increase the size of your image over it’s native resolution, then you will get acceptable results using the sharpening function in your raw converter.
If you will be substantially increasing the size of the image, it is probably best to wait until after you have resized the image to perform any sharpening, because increasing the size of the image after sharpening will also increase the size of the sharpening “halo” and potentially make it visible in your final output.
An alternative to applying capture sharpening in your raw converter is to apply unsharp mask in Photoshop. Applying this sharpening globally however, can increase the apparent noise in an image. The USM function doesn’t really have the capability to find edges, but increases the contrast between every pixel that is not excluded by the “threshold” setting. The threshold slider sets the parameter for how far apart in tonal value (on a scale of 0 – 255) the pixels need to be before they are affected by the filter. The default threshold value of 0 changes the contrast of every pixel in an image that has a different tonal value than pixels adjacent to it. This means the contrast between “noisy” pixels in an image will also be enhanced, thus accentuating the noise. To prevent this, many photographers use an “edge mask” to selectively determine where the sharpening will be applied. I’ll list the general steps for a recommended “non-destructive” method of capture sharpening, then we’ll go through the detailed steps one-by-one.
Capture sharpening: 1. Add a new layer to apply your sharpening to. (This preserves your original layers in case you want to come back to an unsharpened version later.) 2. Add a layer mask on this layer 3. Copy the image into the mask 4. Find Edges on the mask 5. Invert the mask (light areas will be sharpened) 6. Blend the edge mask to soften the transition between sharpened and unsharpened areas of the image 7. Adjust levels/curves on the layer mask to modify how much sharpening will be applied to portions of the image identified by the light areas of the mask 8. Apply the unsharp mask filter on the sharpening layer 9. Adjust the layer blending range to protect our highlights from blowing out and shadows from blocking up. 10. Adjust opacity of the Sharpening Layer to modify the overall amount of sharpening applied to the image
Saving a Sharpening Action A step by step process like the one we are about to perform for capture sharpening is a perfect candidate for a Photoshop action. The action function in Photoshop can be used to record steps, and then play them back at a latter date. This will automate the otherwise arduous task of performing these sharpening steps on each image.
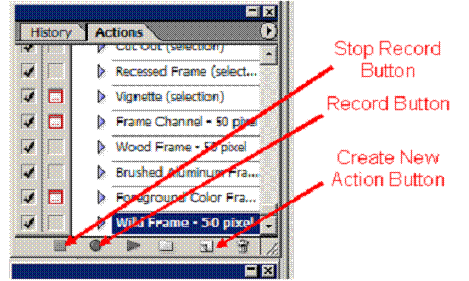
To record an action, open the Actions palette. (If you can’t find the Actions palette on your screen, access it through the window menu.)
Select the “create new action” icon on the bottom of the Actions palette. In the New Action window, type a name for your action. Let’s call this one “capture sharpening.” Select the Record button. From the time you select this button, Photoshop will be recording your actions. As we perform the capture sharpening steps listed below, we will be recording the steps into our action.
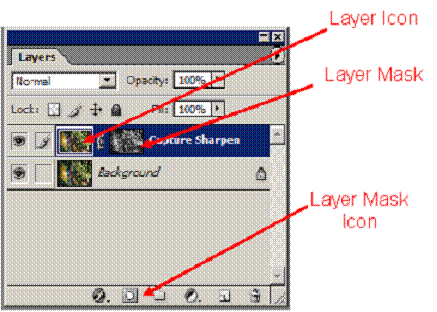
1. On the Layer menu select new and layer 2. Name the layer “capture sharpen” 3. Change the layer mode to Luminosity using the dropdown menu 4. Set the opacity at 66% using the dropdown slider. NOTE: Adjusting the opacity of this layer in the future will allow you to globally adjust the amount of sharpening applied to the image. An opacity of 0% will cancel the sharpening effects of this layer, while an opacity of 100% will have the maximum effect. 5. Select “OK” or hit the enter key 6. Open the Layers palette and select the “capture sharpen” layer with your mouse 7. Use the key combination of Shift + Control + Alt +E (Shift + Command + Option +E on Mac) to stamp the visible layers into the selected layer. (Visible layers are identified with an eye icon in the column to the left of the layer thumbnails.) 8. Use the key combination of Control + A to select the contents of this layer 9. Use the key combination of Control + C to copy the layer to the clipboard 10. On the Layer palette, select the layer mask icon. (See figure 8.) A white “layer mask” will appear to the right of the layer thumbnail for the “capture sharpen” layer on the layers palette.
Figure 8: Layers Palette
11. Hold down the Alt key and mouse click on the layer mask (the white mask will fill the image window on your display) 12. Use the Control +V key combination to paste the contents of the clipboard into your layer mask 13. On the Filter menu select Stylize and Find Edges. NOTE: The Find Edges filter will produce a view that illustrates the edges in black, with the remainder of the image in white. 14. Invert the mask, either by using the Control + I key combination or through the image menu by selecting adjustments and invert. NOTE: The light sections of this mask identify the portions of the image that will be sharpened, while the dark portions identify those areas where no sharpening will be applied. You can change the amount of sharpening that will be applied by darkening or lightening the mask using levels or curves adjustments. 15. Apply the Maximum filter to slightly expand the edges by selecting the Filter menu and selecting Other and Maximum. Apply a radius of 4 or 5 pixels. 16. Apply the Median Filter to average neighboring pixels and smooth the sharpening affect by selecting the Filter menu and selecting Noise and Median. Apply a radius of about 3 pixels. 17. Apply the Gaussian Blur filter to feather the edges of the mask and blend the sharpened and unsharpened areas of the image by selecting the Filter menu and selecting Blur and Gaussian Blur. Apply a radius of about 5 pixels. 18. Use a levels adjustment to adjust how much sharpening will be applied to portions of the image identified by the light areas of the mask. On the Image menu select , Adjustments and Levels. Because we are recording this in an action, and want the action to automatically adjust levels each time it is run, we will select Options, set clipping amounts at 0, and select OK and then OK again to commit the levels adjustment. 19. Mouse click on the layer icon to select the image data for that layer. 20. Select the unsharp mask filter through the Filter menu by selecting Sharpen and Unsharp mask. 21. Select a threshold of zero, a radius of .3 or .4 pixels, and an “amount” somewhere between 150% and 400%. Select the “preview” check box and move the slider between 150% and 400% while observing the image at 100% on the screen. Be sure to select an “amount” setting that does not produce visible halos at this step in the sharpening workflow. NOTE: Since we are recording an Action for later use, a good default amount for this action is 400%. We can reduce the sharpening affect after the action is run by adjusting the opacity of this sharpening layer. 21. Select OK to apply the settings you have selected in the USM filter. NOTE: During the next series of steps, our goal is to protect the highlights from blowing out, and the shadows from blocking up, so we’re going to set our blending range on the layer to protect the darkest and lightest pixels from any contrast enhancement. 22. Double click on the layer icon, which will bring up the Layer Style window. 23. On the slider at the bottom of the window labeled “this layer,” drag the white point slider down to about 195. Hold the Alt key down and drag the left side of the white point slider down to about 100. NOTE: This sets the layer blending mode so that no pixels above a luminosity level of 195 on the sharpened layer will be blended into the final image, and the pixels between a luminosity range of 100 and 195 will be partially blended. 23. Set the blending level of the darker pixels by dragging the black point slider up to about 25. Hold the Alt key down and drag the right side of the black point slider up to about 40. NOTE: This sets the layer blending parameters so that no pixels below 25 on the sharpened layer will be blended into the final image, and the pixels between a luminosity range of 25 and 40 will be partially blended. 24. On the slider labeled “underlying layer,” set the two halves of the white point slider at 80 and 200, and the black point slider at 25 and 40. 25. Select OK to commit the modifications to the blending range in the layer. These changes will protect the highlights and shadows from becoming too contrasty.
This completes the capture sharpening steps, so now it’s time to stop the recording on our “capture sharpen” action. (Hit the “stop record” button on the actions palette.)
In the future, you will be able to adjust the amount of sharpening applied by this sharpening layer by adjusting the opacity of the layer. You can also selectively adjust the sharpening by selecting and modifying the layer mask on the layer. |
|
Spirit of Photography Keith and Rebecca Snell |