
|
Digital Photography Tutorials |

Digital Photography “From Camera to Print”By Keith and Rebecca SnellTransferring the Image from the Camera Basic Post-processing in Photoshop Building and saving a Sharpening Action
|
|
PHOTOSHOP
We’re now ready to begin processing the image in Photoshop. For this lesson, we will assume that we are working with an image where we have already made all of our global exposure, white balance and contrast adjustments in our raw converter. We will use Photoshop to make our “selective” changes to our reference image. After we have made all our selective changes, we will save a high quality reference image in our archives and then prepare a copy of the image for our specific intended output.
Layers It’s always a good idea to keep a pristine, unaltered layer of your image so that you can undo your changes and “recover” to the original image at any time in the future. So before we start, lets make a copy of our original image onto a layer so we can work on it. There are several ways to add a layer in Photoshop, but we’re going to use the Layer menu so we can be consistent when we add other types of layers latter on. Our original image layer defaults to Background, so on our Layer menu we want to select New and Duplicate Layer. You will get a popup window that prompts you to name your new layer. We make it a habit to name our layers so that we know what actions we took in each individual layer. In this case we will call the layer Dust Spotting.
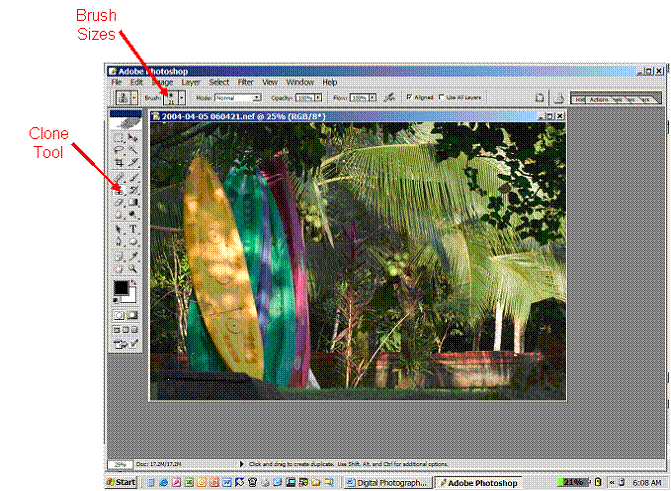
Clone Tool for Dust It’s a good idea to start with correcting any apparent problems with the image, and then move on to any enhancements required. You should probably check first to make sure you don’t have any blemishes in your image caused by dust on your sensor. The area where these blemishes show up the most is usually in the sky areas of your image. View your image at 100% and pan across the screen looking for any dust spots.
Figure 4: Clone Tool
If you find dust specks or other image imperfections you want to remove, select the clone tool, size the brush large enough to cover the dust speck, move the hardness slider on the brush window all the way to the left (you want soft edges to hide the clone), select a clear area of the sky with similar color and tone, hold down the ALT key and mouse click on the “source” area you want to copy. Move the brush over the “destination” area, and click the mouse again. Repeat for any other dust specks. You can use this same technique to correct other blemishes in your image, such as skin blemishes in portraits, distracting elements in the picture etc.
Once we have corrected all of the blemishes on the original image, we’re going to save our “reference” copy as an archive for future use, and then crop, size and sharpen a copy of this image for our intended output. We’re going to save this image as a PSD file, since this allows us to retain both out original background layer and our adjustment layers and enables us to easily modify our changes in the future. In the Save dialogue window, ensure Layers and ICC Profile are checked.
Image Size Once you have saved your high quality reference file, open a copy to use for your specific output. It’s usually easier to adjust the size of the image first, then crop the image to the final dimensions you want for your output file. In the Image menu, select Image Size to launch the “Image Size” window. The top portion of the window shows the pixel dimensions of the image. If your sensor size is 3008 x 2000 pixels, then this is what will be shown in the upper portion of the window. The bottom part of the window shows your document size and resolution. The resolution selection determines how the pixels in your image file are mapped to the output file size. If the pixel dimensions of your image are 3008 pixels by 2000 pixels, and you choose a resolution of 300 pixels/inch, then your document size will be 10.027 inches (3008 pixels divided by 300 pixels/inch) by 6.667 inches (2000 pixels divided by 300 pixels/inch). Changing the resolution to 240 pixels/inch will result in a document size of 12.533 x 8.333 inches.
You can also interpolate the image pixels to provide a larger file size by selecting the “resample image” checkbox. With this checkbox selected you can increase your pixel dimensions, document dimensions, or resolution and Photoshop will interpolate the existing pixels and add additional pixels to the file to increase your image size. The interpolation method can be selected by using the dropdown menu next to resample image. Adobe recommends using bicubic smoother to interpolate to a larger image size, and bicubic sharper to interpolate to a smaller image size.
For this exercise, we want to send a file with dimensions of 8x10 and a resolution of 300 dpi to the printer. You should ensure 300 pixels/inch is selected for resolution, check the Resample Image check box, select bicubic smoother from the dropdown menu, and then change the height dimension to 8 inches. Photoshop will interpolate the pixels in the image to provide a document with at height of 8 inches at 300 pixels/inch. This interpolation will result in a document width of 12.032 inches, so we will need to crop the extra 2.032 inches off the width of the document.
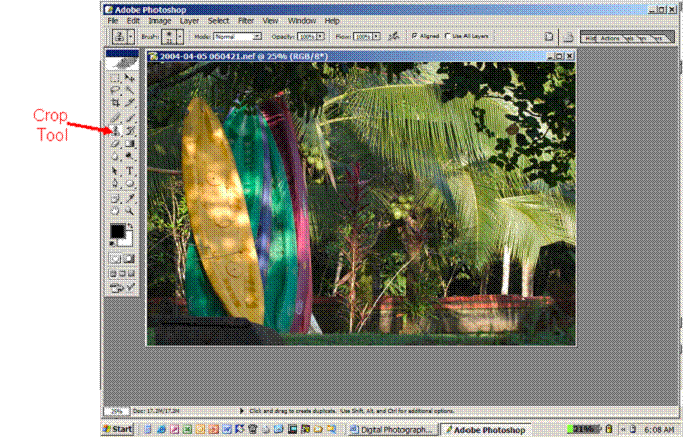
Crop Tool To provide a visual reference to aid in cropping the image to the right size, we want view a ruler on the side of the image, so select the view menu and then select rulers. A ruler will appear on the vertical and horizontal edges of your image. Next, select the crop tool from your tools window. It’s easiest to begin in the upper left of your image, click the mouse and drag the crop tool across the image and observe the dotted reference line that moves across the rulers as you move the crop tool. Line the reference line up with the dimensions you want, and release the crop tool. The cropped areas of the image will be masked to provide a visual indication of what will be cropped once you accept the selection. If you want to adjust the crop, place your cursor over the dotted crop line and drag it to your new crop location. Once you are happy with the selected crop, press the enter key or click on the check symbol on the right side of your toolbar to commit the crop.
Figure 5: Crop Tool
In the next Section we will cover how to sharpen your images for display or printing. |
|
Spirit of Photography Keith and Rebecca Snell |

