
|
Digital Photography Tutorials |

Digital Photography “From Camera to Print”By Keith and Rebecca SnellTransferring the Image from the Camera Basic Post-processing in Photoshop |
|
Camera Raw
Exposure Adjustment We will use both the image preview and histogram to judge our exposure adjustments to the image. On images that contain moderate or high contrast, our goal is to have a histogram that fills the available color space without clipping. We will start by adjusting the exposure slider so that the histogram just touches the right side of the window, without clipping. (Clipping is indicated by a spike in the histogram where it butts up against the edge, as shown in Figure 3.) This will map the brightest parts of the image to the appropriate tones in the colorspace.
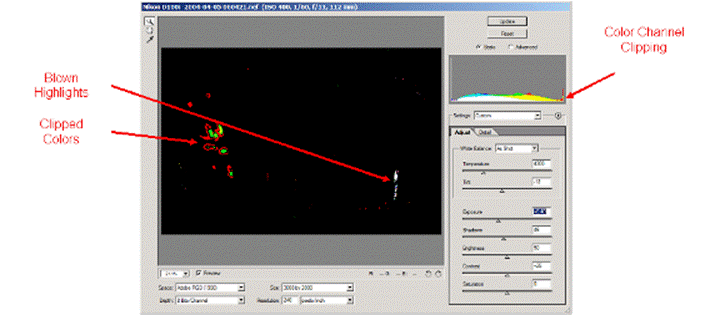
A useful technique during this adjustment is to hold down the Alt key as you move the slider. The preview screen will turn black, except for a display that shows where specific colors are being clipped. The screenshot below show where the yellow, green and red channels have all been clipped in the overexposed areas of the yellow kayak. You can also see indications of this clipping in the spike on the right side of the histogram. In this situation we would pull the exposure slider back to the left until the highlighted areas disappeared from the preview screen.
Figure 3: Exposure Adjustments We repeat this same technique while adjusting the shadows slider. Again, holding down the Alt key while moving the slider to the right until just before the shadows begin to clip. If your shadows are already clipping, then move the shadows slider to the left until you no longer see indications of clipping. Performing these actions is very similar to adjusting the white and black point sliders on the levels adjustment in Photoshop, except in this case you are defining where the raw sensor data will be mapped to in the chosen color space. Be sure and watch the preview image as well, to ensure the changes you are making will not result in the image being too flat.
There is one other “exposure” adjustment we may want to make, and that is adjusting “brightness” which adjusts the mapping of the mid-tone values in your image. Moving the slider to the right will make the mid-tones brighter, while moving the slider to the left will make them darker. This is equivalent to adjusting the middle gray slider in the Photoshop levels adjustment. You can observe on the histogram and the image preview how this adjustment remaps the midtones in the image. Most of the time when we use this adjustment it is to brighten midtones that appear too dark.
The contrast slider is used to adjust the image contrast. Moving the slider to the right increases contrast, and moving the slider to the left decreases image contrast. If we use this slider it is normally to increase the contrast of an image that looks “flat.” This control works just like a “curves” adjustment in Photoshop. The mid-point of the contrast curve this control applies is defined by the brightness slider, so these two controls may need to be used in conjunction with each other to adjust the midtones in relation to the darker and lighter tones. Don’t overdo it. Increasing the default contrast from +25 up to +40 is normally sufficient to replicate the high-contrast look of Velvia slide film that many nature photographers have come to like.
The final adjustment is saturation. This adjustment is subjective based on your interpretation of how the scene should look. Again, don’t overdo it. A saturation adjustment between +10 and +20 is usually enough to get the saturated Velvia colors to make an image pop. Even so, this is often too much adjustment, and will result in an unnatural looking image.
If you have the “basic” option selected at the top of the Camera Raw window, then you can select the Detail tab to access additional image adjustment options. On this tab you can make adjustments to sharpness, luminance smoothing, and color noise reduction.
The Sharpness slider can be used to adjust the amount of sharpening applied to your raw image. The luminance smoothing and color noise reduction adjustments are typically only needed for reducing noise in high ISO images, so we will leave these sliders where they are for now. |
|
Spirit of Photography Keith and Rebecca Snell |
