
|
Digital Photography Tutorials |

Digital Photography “From Camera to Print”By Keith and Rebecca SnellTransferring the Image from the Camera Basic Post-processing in Photoshop |
|
Camera Raw
White Balance From here on out, the controls in Camera Raw are pretty much laid out in the order you will be using them. We will start with white balance first, since our settings here will affect how much we will want to adjust our exposure and shadow settings in the next several steps. It is probably worth a quick review of the concept of “white balance” from our initial lesson before proceeding on to the white balance adjustments.
“White balance” is based on the concept that different light sources emit light at different color “temperatures,” and reflection of this light off a subject will affect our color perception. “Warm” light is defined as light that we perceive to have a “warm” tone, tending toward yellow. “Cool” light is defined as light that we perceive as having a “cool” tone, tending toward blue. Sunlight at sunrise and sunset has a “warm” tone, as do incandescent light bulbs. If we were to take a picture of a white object under this light without correcting for white balance, it would look yellow, and all the other colored objects in the scene would have a yellow colorcast as well.
We can correctly render the colors in the scene by applying color compensation for that particular temperature of light. We do this by selecting a “white balance” setting for that particular light source. Your camera also has an “auto” white balance setting. When set on auto, the camera measures the color balance of the image and attempts to guess the temperature of the light source based on this color balance, but because the objects being photographed also affect the color of the image, the camera can’t always correct the white balance with perfect accuracy. The “auto” setting is biased towards mid-day sunlight, and the correction factors applied in warmer and cooler light are fairly conservative. In practical use, the “auto” setting will get you closer to an accurate color balance, but not as close as setting the white balance yourself.
The White Balance adjustment in Camera Raw has a drop down menu with selections for “as shot,” as well as the typical “daylight,” “cloudy,” “shade,” “tungsten” (incandescent), “florescent,” and “custom.” With most cameras, the “as shot” selection will work effectively to transfer over the white balance that was recorded by the camera in the “auto” setting. If you have selected a specific white balance setting in the camera such as “cloudy,” this setting may or may not transfer over correctly depending on how the camera manufacturer has recorded the setting in the image file. If you know the conditions that the image was taken in, then select the appropriate white balance from the drop down menu.
It’s important to realize however that this version of Camera Raw is based on “generic” profiles for your specific camera. We have found that if we have used auto-white balance or preset white balance to set the white balance in camera, then the “as shot” selection is a good option, since it is based on white balance parameters passed on from your camera. The other options in Camera Raw however, (daylight, cloudy, shade, etc.) are based on “generic” profiles and have not been optimized for your particular camera. You may have to adjust the temperature and tint sliders to adjust the white balance provided by the dropdown menu selections. In a follow-on lesson we will cover how to profile Camera Raw to better match your camera’s parameters.
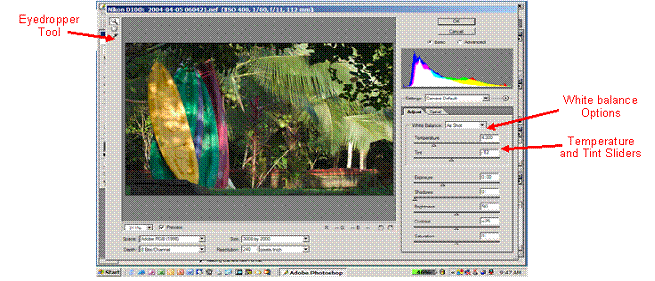
If you haven’t used auto white balance or your cameras “preset” white balance function to set the white balance in your camera, then your next best option is to click balance on a neutral gray part of the image using the eyedropper tool. Just select the eyedropper tool in the upper left of the Camera Raw windoww and click on a color-neutral portion of the preview window and this will set a custom white balance.
Figure 2: White Balance Adjustments
You can then toggle back and forth between this custom white balance and the other menu options to determine your preference. The strength of the Camera Raw white balance tool comes into play with the slider controls for temperature and tint. You can modify any of the available white balance options by adjusting the sliders, and this becomes a new custom white balance.
The temperature slider moves the color temperature of the image between blue and yellow. Moving the slider to the left will compensate for a “warmer” white balance temperature by making the image colors more blue, while moving the slider to the right will compensate for a “cooler” white balance temperature by making the image colors more yellow.
The tint slider adjusts the image from green to magenta. Moving the slider to the left will shift the image colors towards green, while moving the slider to the right will shift the colors towards magenta. You can select a white balance menu option that best matches the light source the image was taken in, and then tweak the white balance with the sliders provided.
The next step in the raw file processing is to make any exposure adjustments required. A logical process for optimizing the exposure of your raw image is covered in the next section.
Transferring the Image from the Camera |
|
Spirit of Photography Keith and Rebecca Snell |
