
|
Digital Photography Tutorials |
Nikon Digital Photography TutorialBy Keith and Rebecca Snell |

|
The Histogram
Ansel Adams would have loved the histogram, since it shows the distribution of tones in the image at a glance. The horizontal axis corresponds to brightness, with dark tones to the left and bright tones to the right. The vertical axis shows the number of pixels of each brightness in the image. A typical low contrast scene will show a bell curve of tones, hopefully centered in the histogram display. If the image is underexposed, the histogram will be mostly on the left side of the display, and if the image is overexposed, the histogram will be on the right side. A high contrast scene will show a histogram stretching across the display, and if there are pixels outside the range of the sensor, the histogram with indicate this by showing pixels butting up to the edge of the histogram display. This is a good indication that some pixels have been “clipped” because they were outside the range of the sensor.
|

|
The histogram can provide a good indication that you need to adjust your exposure. Determining just how much adjustment is needed requires using both the histogram and knowledge of the zone system. First, it is important to know that the histogram display is not linear. The middle of the display corresponds to your mid-tones, but when the tone curve is set to “normal” (more about this later) the area to the right of middle covers about 2.5 stops, and the area to the left of the middle covers about 4 stops, in a logarithmic scale (for the Nikon D100 and D70). This means that only a small amount of the display on the far left side shows pixels in zone 1 (four stops under), a slightly larger area just to the right of zone 1 is used to indicate pixels three stops under, and correspondingly larger areas are used to indicate pixels two and one stop under mid-tone. You can use the vertical gridlines displayed to the right and left of center on the histogram as a rough approximation of a 1-stop difference from mid-tone, but it is more accurate to use your analog exposure display and spot meter to measure how many stops of adjustment are needed to expose the scene so the highlights are not clipped. If forced to make a choice between clipping the highlights and clipping the shadow areas, it is almost always better to clip the shadows (underexpose). Some detail can be restored in the shadows by adjusting the distribution of tones during post processing, but highlight detail can never be restored once it is lost. If you are shooting in a fast paced situation that doesn’t give you time to spot meter the highlights, just “guesstimate” how many stops of adjustment are needed, based on how much of the histogram appears to be clipped, set exposure compensation and try again. |
|
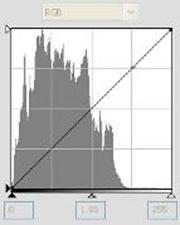
Histogram of Under-Exposed Scene (- 1 Stop Under)
|
|
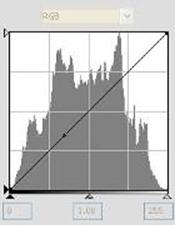
Histogram of Correctly Exposed Scene |
|
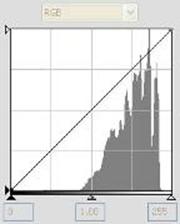
Histogram of Over-Exposed Scene (+1 Stop Over) |
|
Spirit of Photography Keith and Rebecca Snell |