

|
Digital Photography Tutorials |
Digital Photography “From Camera to Print”By Keith and Rebecca SnellTransferring the Image from the Camera Basic Post-processing in Photoshop Building and saving a Sharpening Action
|
|
Camera Raw
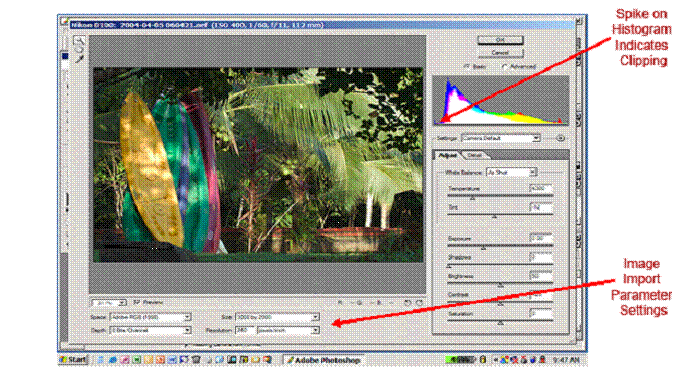
The Histogram We will use both the image preview and the histogram to help guide us through the necessary image adjustments. (Check the preview check box in the lower left of the Camera Raw window so that you can see the effect of your adjustments as you are making them.) As we discussed in our previous lesson, the histogram shows the distribution of tones in the image at a glance. The horizontal axis corresponds to brightness, with dark tones to the left and bright tones to the right. The vertical axis shows the relative number of pixels at different levels of brightness in the image.
A typical low contrast scene will show a bell curve of tones, hopefully centered in the histogram display. If the image is underexposed, the histogram will be mostly on the left side of the display, and if the image is overexposed, the histogram will be on the right side. A high contrast scene will show a histogram stretching across the display, and if there are pixels outside the range of the sensor (or chosen color space), the histogram with indicate this by showing pixels butting up to the edge of the histogram display. This is a good indication that some pixels have been “clipped” because they were outside the range of the sensor (or color space). We’ll talk more about this “clipping,” and what to do about it later in the lesson.
In the next section we will cover the basic settings for the Import Parameters (Color Space, Bit Depth, Size and Resolution) in the lower left of the Camera Raw Window. |
|
Spirit of Photography Keith and Rebecca Snell |