The last time we had a weekly assignment dealing with macro photography was back in June of 2009, and with spring (and flower and bug photography just around the corner) this seems like an opportune time to cover macro techniques in more detail. First, a bit of a definition is in order. In the "old days," macro photography was understood to mean that you would be reproducing an object in a 1:1 ratio on the film. In other words, if you took a picture of a ladybug that was 4mm long, then the image of the ladybug would be 4mm
on the negative (and even larger when printed). Our definition of macro photography has evolved over time, so that now we understand macro photography to include magnifications that would result in an object being displayed as life-size or larger on a standard 4x6 inch print. (So a 1:4 magnification would qualify as a macro, since a 1" tall negative would be enlarged to 4" when displayed as a 4x6 print.) For the purpose of this exercise we will define "macro" as an image that reproduces your subject as life-size or larger when displayed on a computer monitor in a size roughly equivalent to a 4x6 inch print.
Two technical areas that will have a very significant impact on your macro photography are: 1) critical focus and 2) camera/subject movement. I'll start by covering critical focus. First, you should understand that because of the close focusing distances involved with macro photography, your depth of field will be
extremely small. Let's look at my pansy image as an example. I took the shot at a "middle" aperture of f6, yet you can see in the image below that the depth of field is still very very small. (Some would describe it as "paper thin.") It's also important to understand that just because your subject falls within the depth of field doesn't mean that it will be critically sharp. Only areas at the focus plane and
very close to the focus plane will be sharp (as demonstrated in the image below).
 Pansy
Pansy85mm macro lens, f6
Where I focused in this image had a
tremendous impact on the success or failure of the image. I consciously lined up my focal plane so that it passed through the elements that I wanted to emphasize in this composition, including the water droplet, the edge of the top petal, and the curve of the petal on the lower right. (Focusing on the curve of the petals helped me to emphasize the flowing forms and sense of "movement" that Michele liked in this image) I "lined up" the focal plane by making sure that the sensor plane (and by extension, the front element of my lens) was parallel with the imaginary plane running through the critical elements in my scene. Then I very precisely
manually focused the lens, making small adjustments to my camera position and orientation as needed. Why manual focus? Because autofocus, although it would have gotten close, would not have given me enough control to focus precisely where I wanted to. Even missing focus by a fraction of a millimeter would have changed the "character" of this image.
Many people fall into the trap of thinking that because they are using a small aperture (f16 - f22), their subject will be "sharp" because it is within the depth of field; however, that is not really true. Only portions of the image that are directly in the plane of focus can be critically sharp (by definition). All the other areas will be merely "acceptably" sharp, which essentially means that to the casual observer the subject will be rendered well enough that it doesn't look objectionably blurry. But you won't be able to see the sharp, well defined detail that you can see at the plane of focus. So ALWAYs align your plane of focus with the most important areas in your scene. A useful technique is to use "focus bracketing." After you have taken an image that you believe is correctly focused, reset your focus and try again. Chances are you will focus on a slightly different plane, and at these magnifications sometimes even those very tiny differences can make a difference.
You will find that most photographers that shoot a lot of macros will gravitate towards the two "extremes" with respect to apertures/depth-of-field. They will either shoot at a very small aperture (f16 to f22) in an attempt to keep everything in the scene in sharp focus, or they will shoot at or near "wide open" on the lens in order to keep only a portion of the scene in focus and blur the background. (Going smaller than f16 or f22 (depending on the lens) will result in significant softening of the image due to diffraction effects.) Typically the "in between" apertures will result in a distracting background, and still won't be sufficient to get all of the primary subject in focus. In the case of my
Pansy image, I consider f6 to be near enough "wide open." I started at f2.8 and then closed the aperture in 1/2 stop increments while observing both the in-focus and out-of-focus areas in the image (using depth of field preview). Smaller apertures gave me better definition in the water droplets and allowed me to get more of the petal edges in focus; however, at apertures any smaller than f6, the background became "chunky" and distracting, so that's where I compromised. Whether you shoot at the "wide open" extreme and attempt to blur the background, or stop down to the f16/f22 range will depend primarily on your scene. If you can get all of the scene to fall within the depth of field by stopping down to f16, then that is typically the choice photographers will make. If however, some of the background falls outside the depth-of-field (and into the "not-quite-in-focus" range) then you are often better off trying to isolate portions of your subject against a softly blurred background.
The
Moss and Bricks image below is an example of a scene where everything is close enough to being in the same plane that you would be able to shoot at smaller apertures in order to get everything in the scene in sharp focus. These types of scenes are actually fairly rare though, and most times I find myself shooting at the "wide open" end and blurring out a potentially distracting background.
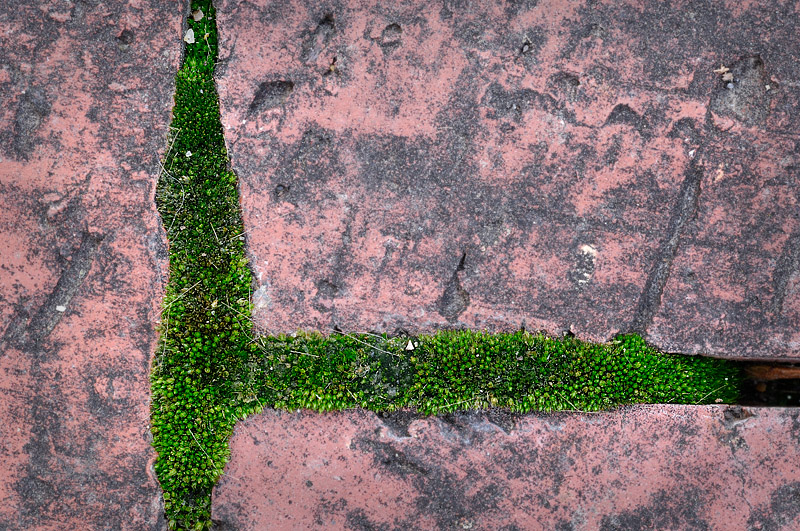 Moss and Bricks
85mm, f15
The other technical area that will have
much more impact on the success of you images than most people think it will deals with camera movement. It is important to understand that what draws viewers to macro images is the ability to perceive much more detail than they can see with their naked eye. It's this fine detail that makes the images "hyper-real" to us, and captivates our interest. Because we are talking about very fine details (we're talking micrometers, not millimeters) even very small camera movements can blur the detail and eliminate the "hyper-real" sensation we get when viewing a well executed macro image.
Handholding your camera is definitely a recipe for poor macro images. Not only will you induce motion blur from any side-to-side motion of the camera, but you will also sway forward and back just a bit (it's impossible not to) and that will move the very narrow focus plane and depth of field off of the critical areas of the image. There is NO WAY I could have handheld my camera to get the framing I wanted in the
Pansy image above and still get the focus plane to pass precisely through the areas in the image that I wanted to remain sharp. Even a fraction of a millimeter forward or back would have moved the focus plane off it's target. You should also recognize that even on a tripod, you can induce motion blur if you don't use proper technique. Even the lightest touch on the shutter button will move the camera enough to cause some loss in sharpness, so use a cable or remote release (or self-timer set to 2 seconds) to trip the shutter. In addition, mirror "slap" can (and will!) induce camera movement, so use the "mirror up" function on your camera to flip the mirror up before tripping the shutter.
Several well-known photographers that I respect insist that the two things that rob detail from an image more than anything else are camera movement from not having a rock-solid tripod (and good technique), and flare caused by strong "off angle" light hitting the front element of your lens, bouncing around inside the barrel and "veiling" the details through reduced contrast (like sun shining on a dirty windshield). So in addition to using a tripod, you should always use a lens hood if you want to retain the most contrast and detail in your images.
Finally, don't forget to turn image stabilization OFF when you are shooting on a tripod (and have everything locked down tight). Although some of the newer image stabilization/vibration reduction technologies can sense when the camera is on a solid tripod support and automatically disable the function, most don't, and so it is better to turn IS/VR off. Leaving image stabilization on and shooting from a solid tripod will almost certainly
induce motion blur into your images. (Some of you experienced that for yourselves during our Crested Butte and Yellowstone workshops.) IS/VR is useful sometimes when you are photographing critters that move a lot, but you will always get better results shooting from a stable tripod with good technique (using a cable release in conjunction with mirror up.)
So now it's time to get shooting!

Please upload your images to the "Macro Revisited" album in the Weekly Assignments category of the Gallery no-later-than midnight Mountain Time (GMT -07:00) on Sunday, 10 April 2011.
I will look forward to seeing more of your inspiring images!
Keith
P.S.
When you are shooting low to the ground, don't forget to use a bubble level or "virtual horizon" if your camera has that capability. It's very, very difficult to judge whether the camera is level when your head is tilted down at an angle.


