Its been a while since we have had an assignment where we talked about exposure, so I think we are due for one. The assignment for the week of 29 November 6 December 2009 is Specular Highlights. Specular highlights occur when light is directly reflected off smooth surfaces such as glass, chrome or water. The term specular means that light is perfectly reflected in a mirror-like way from the light source to the viewer. This is in contrast to diffuse highlights which are reflected off uneven or granular surfaces.
So what does this have to do with exposure? An often used phrase in digital photography is expose to protect the highlights; however, specular highlights are typically so much brighter than the rest of our scene that if we try to adjust our exposure in order to protect specular highlights, then we will end up significantly underexposing the rest of the scene. In a scene where the primary subject contains mid-tones important to the success of the image, we should instead let the specular highlights in the scene be exposed and printed as pure white. In this case, Expose to protect the highlights is actually misleading, and should more properly be stated as expose to retain detail in the brightest areas of the scene that contain important detail, such as textured snow or white sand.
There is also a danger that if the specular highlights cover a large portion of the scene (such as light reflecting off water), this bright light will fool your exposure meter into underexposing the scene. One way to ensure this doesnt happen is to use spot meter to meter a portion of the scene that doesnt contain specular highlights, or frame an adjacent area of the scene to set your exposure and then recompose to include the highlights in your composition.
Ricks
Crystal Glass image is a great example of a properly exposed image that contains specular highlights. If you examine the highlight areas in Photoshop, you can see that all three color channels are blown, with values of 255, 255, 255 (equivalent to pure white). Chances are these highlights were a small enough portion of the scene that they didnt fool the meter into underexposing the image.
 Crystal Glass
Photographed by Rick Pepin
(Thanks for the example Rick)
When photographing a scene with specular highlights, we also need to be careful not to be fooled by the histogram. In this case, the histogram has the telltale spike on the right hand side that indicates a portion of the image is clipped or overexposed. Our general guidance for using the histogram is to ensure that the histogram just touches the right side of the scale, but doesnt spike, which would indicate significant clipping. Lets look at the histogram for Ricks
Crystal Glass image:
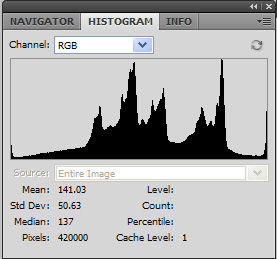
Histogram from
Crystal GlassIf we were blindly following rote, and lowered our exposure to correct the histogram, we would underexpose the rest of the image. In a situation like this, the photographer should recognize the impact of the specular highlights on the histogram, confirm that it is in fact the specular highlights that are clipping by examining the image on the LCD using the blinking highlights indicator, and make the conscious decision not to underexpose the image to protect these clipped specular highlights.
Your assignment for the week of of 29 November 6 December 2009 is Specular Highlights. You should compose an image that contains specular highlights, taking care to properly expose the primary subject in the image. Please upload your images to the Specular Highlights album in the Weekly Assignment Category of the Gallery no-later-than midnight, Mountain Time (GMT -07:00) on Sunday, 6 December 2009.
Ill look forward to seeing your images.
Keith


