Thank you to everyone that participated in the "High Contrast" assignment. As I mentioned in the description of the assignment, typically we would avoid photographing in high-contrast light, since this type of lighting doesn't lend itself to very "pleasing" images. Many of our past assignments have emphasized the use of "soft" (low-contrast) light to produce pleasing 3-dimensional images that flatter our subjects. Unfortunately, we can't always photograph in optimum lighting conditions, and knowing how to properly expose high contrast scenes is something every good photographer should understand and practice. In addition, there are some scenes that just won't "fit" within the dynamic range of our digital cameras without our first adjusting the exposure appropriately.
The guidelines for this assignment were to compose an image of a high-contrast scene, using exposure techniques such as the Zone System and spot metering to control the distribution of tones (exposure) in your image. I hope those of you that attempted to "push the envelope" learned a bit more about how to successfully create images from a high contrast scene.
Rick's
Street Lamp image was a very good example of controlling the exposure to provide a pleasing rendition in a high contrast scene. When I asked Rick how he exposed the image, he said " focusing on the center of the light pole and set the f stops at f11 and set the meter in the camera just to the right of center." "Just right of center" on a Nikon camera means that he set negative exposure compensation. I'm guessing it was probably about 1/3 of a stop, since the sky in this image is about 1/3 darker than mid-tone, providing a very pleasing rendition. The key to making this a successful image was that Rick was able to control the exposure on the white "globe" of the light pole so that we see the texture on the shadow side of the glass, and just a hint of texture on the sunlit side of the glass. Since he was using matrix (or "evaluative" in Canon terms) metering to determine the exposure, and then adjusting the camera recommended settings by using manual exposure mode, I'm betting that Rick was using the histogram to judge whether or not he was "clipping" data, and adjusted his exposures accordingly. Excellent exposure Rick.
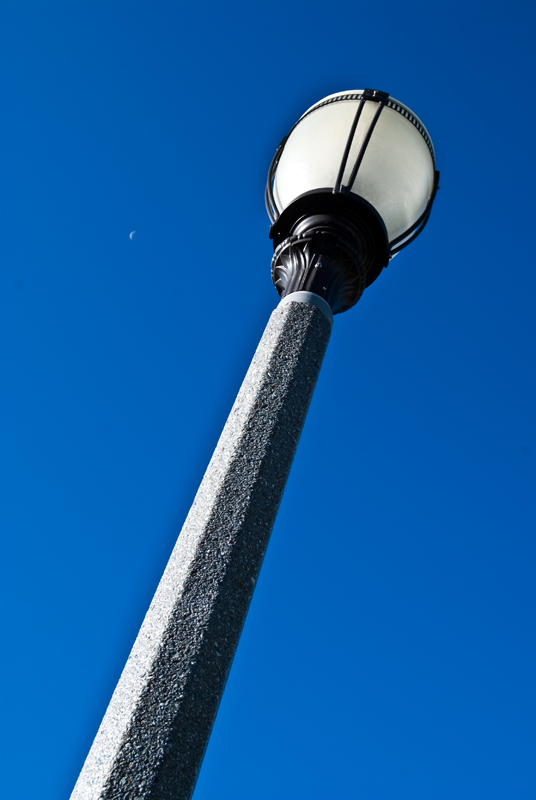
Street Lamp
Photographed by Rick Pepin (trvlRick)
As an aside, I've set up the gallery so that it will display the EXIF information, or camera shooting data for your images. Many viewers find this a useful learning tool, since it allows them to see what settings the photographer used in creating the image. However, if you use the "save for web" option in Photoshop CS3 or earlier, it will strip the EXIF data from the image. Photoshop CS4 "fixed" this by adding an option (under the metadata dropdown) to save "all" EXIF information. I would recommend that you use the "save as" option in Photoshop and then select JPEG instead of using the "Save for Web" option. This retains the EXIF data (including image owner/copyright data) and is a much safer way to post your images on the web. Plus, it allows you to share your camera settings with other interested photographers.
I've awarded Joyce's [csrdrunner]
Zebra Shadows image
Editor's Choice for Artistic Merit. Joyce has a good eye for seeing repeating patterns, and the skill to compose her images to capitalize on the repeating patterns. She also uses linear perspective very well in many of her images. The decision to convert this image to black and white was a wise decision. Because a black and white conversion can mask many of the issues a camera would have with "clipping" one of the color channels, it is an effective technique for displaying high contrast images. In addition, creating an effective black and white image usually entails maximizing the contrast in the image, and so inherently high contrast images often "look better" in black and white. Finally, many scenes with strong patterns, texture, or an emphasis on "form" lend themselves to being presented in black and white, since the lack of color forces us to "focus" on those visual cues instead. Great image Joyce.
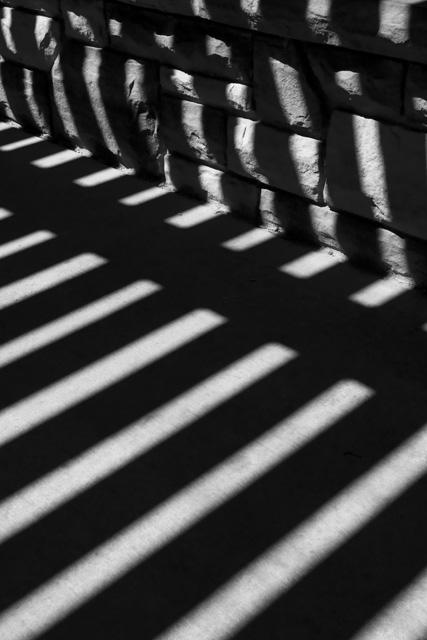
Zebra Shadows
Photographed by Joyce Donaldson (csrdrunner)
Sheila's [burzilai's]
AFA [Air Force Academy] image won the vote for
People's Choice, and I've awarded it
Editor's Choice for Technical Merit. More than any of the other submissions, Sheila "pushed the envelope" with this image, creating a pleasing rendition of a VERY high contrast scene. I couldn't verify it from the EXIF data, but the light on the sculpture indicates that Sheila used fill-flash to balance the light on the subject with the background. Excellent job capturing this very high contrast scene Sheila!
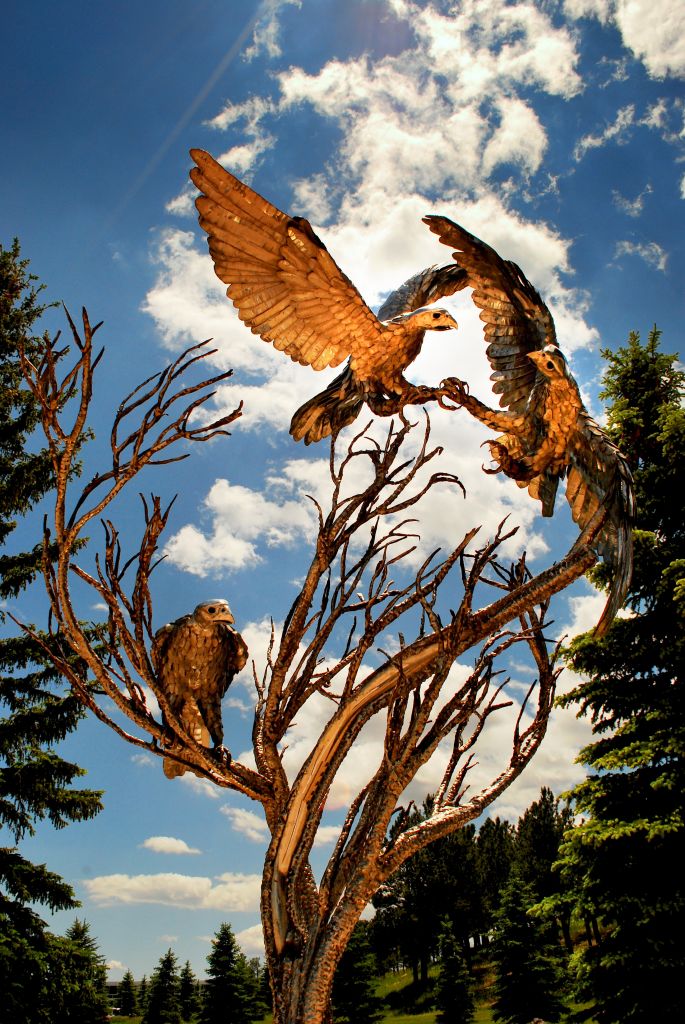
AFA
Photographed by Sheila Ancheta (burzilai)
Thank you again to everyone that participated in the High Contrast assignment. Hopefully you found the assignment a useful exercise to help you solidify your skills at exposing images of a high contrast scene.
Keith


