This assignment gives us an opportunity to emphasize good shooting techniques in the quest to produce an image with outstanding detail. In a sense, this assignment can be considered a follow-on to our "Clarity" assignment, with more emphasis placed on the technical aspects of producing the image (vs the primarily conceptual and aesthetic aspects discussed in the Clarity assignment) .
In the Clarity assignment we talked about how an image with clarity
"will have a 'clearness of reproduction' composed of clear, pure, well-defined lines, forms, colors and textures, and will be free from 'indistinctness or ambiguity.' The viewers appreciation of the subject, of the fine details and texture, will lose nothing during the transmission through the recording device to the screen or print." In fact, a well executed image can draw attention to fine details and texture that the casual viewer might not have noticed in real life. This detail and texture can serve to draw us into the image and provoke us to examine and appreciate the subject. At a certain level of "clarity" an image becomes more than a flat 2-dimensional representation of our subject, and becomes a "window" that helps us explore the subject in more detail.
Capturing this level of detail in our images requires exemplary technique, diligence and discipline. The list of techniques applicable to obtaining sharp images can become almost endless, so I will try to contain this discussion to addressing the techniques that will have the most visible impact. It is also useful to recognize that most of the techniques that we discuss will be used to mitigate the problem of detail-robbing motion blur. This motion blur can be caused both by subject movement, and by camera movement.
There are two primary methods of mitigating the effects of subject motion. The first method is to choose a fast enough shutter speed. You can find many guidelines in photography texts and tutorials that talk about minimum shutter speeds necessary to prevent motion blur in various subjects. It is important to recognize that these are "minimum" speeds, and that choosing a faster speed than the minimum will provide better results. It is also important to recognize that as your subject gets closer to the camera, any motion will result in a greater displacement across the sensor plane, and therefore more potential blur. (A faster shutter speed will be required for subjects closer to the camera.)
The second method of mitigating the effects of subject motion is to...fire the shutter when the subject has paused its motion.

Many experienced wildlife photographers learned this technique as a matter of survival back in the old film days. If a photographer was using high resolution transparency film (required in order to sell publication quality images) then the low ISO resulted in relatively slow shutter speeds, especially during the low light of dawn and dusk when wildlife are most active. A photographer that wasn't paying attention to subject motion would return from the field with nothing but blurry images. You either learned to time your shots when the subject was relatively still, or gave up and looked for a new craft.
The following image of the standing grizzly was taken at a shutter speed of 1/80th of a second, in the dim evening light following sunset, as the grizzly cautiously worked its way in to feed on a carcass. I did everything I could to "optimize the capture" for this image. I was shooting with a 500mm lens and 1.4x teleconverter on a camera with an APS-C size sensor, so the equivalent magnification of this combination was that of a 1,050mm lens. Any movement of the camera or lens during the exposure would have resulted in a blurry image, so I set the lens up on a sturdy Gitzo carbon fiber tripod at its lowest leg extension (requiring me to sit cross-legged on the ground), set "mirror pre-release" (a function that flips up the mirror 1/2 second before firing the shutter, so that the mirror movement doesn't affect the exposure) and used a cable release to fire the shutter. (Even gently pressing the shutter button can induce camera movement when you are shooting at these magnifications.)
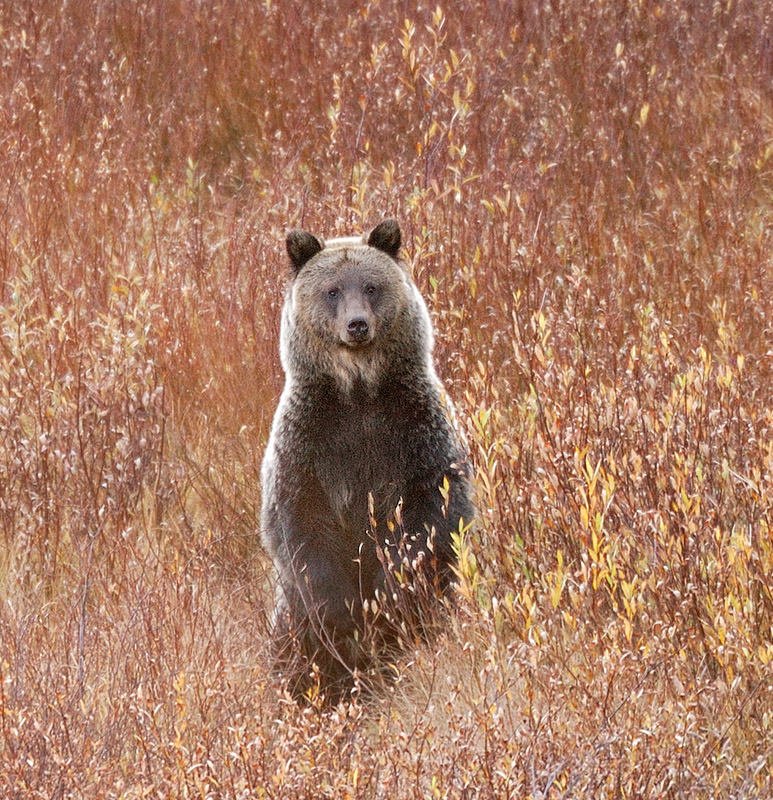
Yellowstone Grizzly
From experience, I knew that a minimum shutter speed of 1/350th of a second was required to prevent motion blur when a bear was moving at a normal ambling pace. (They move much quicker than you perceive them to be moving.) I set my aperture "wide open" at f5.6, and bumped up the ISO to 640, which was the highest I could go on that 2nd generation Nikon digital camera (D100) without inducing objectionable noise into the image. (The noise is still visible, but not too obtrusive.) This gave me a maximum shutter speed of 1/80th of a second, which I knew wasn't nearly fast enough to stop any motion blur from the subject. I followed the bear through the viewfinder, hoping that he would pause long enough that I could get off a shot. When the bear stood I was ready, and managed to fire off two frames while he stared motionless at something that had caught his attention. The opportunity only lasted about a second, but I had my shot.
I used several techniques to mitigate motion blur and capture the shot:
1) Set my ISO and aperture to maximize the available shutter speed
2) Used a sturdy support, in its most stable configuration
3) Used mirror pre-release (now called "shutter delay") to prevent the mirror movement from affecting the image
4) Used a cable release to avoid inducing motion by pressing the shutter button
5) Timed my shot for a moment when the subject was relatively motionless
You should always use mirror lockup or mirror pre-release (shutter delay) when shooting at shutter speeds between (and including) 1/30th and 1 second, since motion blur from the mirror movement will be most visible at these speeds. (It should go without saying that you should also be on a tripod for these shutter speeds.) You should also use mirror lockup or pre-release when shooting at high magnifications (long telephoto lens or macro shots) whenever practical. Even if your camera does not have a mirror pre-release or shutter delay function, you can obtain similar results by using mirror lockup and a cable release, or mirror lockup in conjunction with the camera self timer. (With Canon cameras, setting both mirror lockup and self timer will result in the mirror flipping up when the shutter button is pressed, and the shutter firing two seconds later.)
Although these techniques might seem like overkill, you can get a sense for how much they might contribute to minimizing motion blur by setting up your tripod at normal shooting height at a reasonable shooting distance from a white wall (10 meters is a good test distance), mounting your longest lens on your camera, taping a laser pointer to the lens hood (pointing at the wall), and then taking a shot as you normally would. I can just about guarantee that you will be able to see substantial vibration in the dot from the laser as you take the shot. This should give you a sense of how much motion blur you are inducing into the image with your "normal" shooting technique. The example I gave was for photographing wildlife; however, as we discovered during our wildflower photography workshop, these techniques work just as effectively (if not more so) for photographing wildflowers (or any subject when using high magnification).
You should also realize that as with everything else in life, there is a balance, and that sometimes going too far in one extreme (setting too high of an ISO for example) may be counter-productive. You should set your ISO at the minimum setting required to get the exposure you need. Going higher than necessary will induce detail-robbing digital noise into the image.
As a general rule for most lenses (with the exception of some of the exotic telephoto lenses, which are often at their best shot wide open) setting your aperture to two stops less than the maximum will produce the sharpest results. This means that if your maximum aperture is f2.8, your lens will typically produce the sharpest results at f5.6, and if your widest aperture is f5.6, you will need to stop down to f11 to achieve the sharpest results. (Often f8 is a good compromise when you are also struggling to get a high enough shutter speed.)
On the other hand, setting too small of an aperture will not only reduce your available shutter speed, but may also induce detail-blurring diffraction into the image (at apertures smaller than f11 on an APS size sensor or f16 on a "full frame" sensor). Again, you should strive to balance these factors to optimize the parameters for your specific subject, composition and shooting conditions. Some subjects may require more depth of field, which will require a smaller aperture, and resulting compromises with respect to shutter speed and ISO.
A note on image stabilization/vibration reduction: Turn it off unless you are shooting hand-held (or on a loose tripod head) at shutter speeds slower than 1/500th of a second. Leaving IS/VR on at faster shutter speeds can result in
less sharp images. (The response time of the system is 1/500th of a second, so it becomes counter-productive at faster shutter speeds.)
There are several other techniques that you should be aware of that will help you to retain as much detail as possible in your images. Keep the front element of your lens clean, don't use a filter unless you absolutely need to, and use a lens hood or shade the front element of your lens. (Ever notice how hard it is to see through a dirty windshield when the sun or headlights are shining in your eyes?) You should always shade your lens (unless it is providing its own shade) since even a tiny amount of light shining on the front element of your lens can induce detail-masking flare (characterized by a low contrast image with washed out colors).
Finally, you should strive to get your exposure correct, both in capture and in post processing. Overexposing will cause an immediate loss of detail. Underexposing will also cause areas of the image to become "muddy" with a loss of detail, contrast, and color separation. Watch the histogram, and try to optimize the exposure by exposing as bright as you can while still protecting the highlight areas of the image that contain important details (watch the "blinkies").
Your assignment for the week of 9 - 15 August is to simply

compose an image that retains the maximum amount of detail and realism for your subject. Please upload your images to the "Detail" album in the Weekly Assignments category of the Gallery no-later-than midnight, Mountain time (GMT - 07:00) on Sunday, 15 August 2010
I'll look forward to seeing your images.
Keith
P.S.
I almost forgot to mention focus settings. You should of course strive to ensure that you are focusing your image as precisely as possible. First, adjust your focus mode so that you, the photographer, are making a conscious decision about where the camera is focusing. Unfortunately, many cameras "default" now to a setting where the camera picks the focus point, often focusing on the closest high contrast object in the scene. This may or may not be where you want to focus. Often you can't tell precisely where the camera is focusing because multiple focus points are selected/illuminated. You should manually select a single focus point, and consciously chose where to focus in the scene to optimize the sharpness and depth of field covering your subject. The center focus point is often the most accurate and precise, both because it is a more sensitive "cross" type sensor, and because it is focusing through the relatively aberration free center of the lens. You should always confirm the focus visually and manually tweak the focus when needed. You can zoom in on the "live view" (if your camera has that feature) to confirm precise focus for your most critical scenes.


